14 de abril de 2013

Transforma tu Android en una cámara de seguridad

android_camara_spy


Nos estamos acercando al punto en que muchos ya tienen su segunda generación de Android, más de uno está pensando en cambiar de teléfono y se pregunta qué hacer con el que tiene. Aunque muchas tiendas te ofrecen descuentos si das tu antiguo teléfono, a menudo lo que te dan no es demasiado, así que ahí va una idea de qué hacer con tu terminal viejo: convertirlo en una cámara espía.

Cuando me refiero a una cámara espía me refiero a una cámara que uses para vigilar algo, ya sea tu pecera, la habitación de tus hijos o la nevera de tu casa (quién no tiene compañeros que dicen “no haber comido lo que falta”). Las cámaras para este tipo de cosas no suelen ser baratas, así que es una opción muy interesante. Sin más dilación comencemos.


Qué necesitamos y qué vamos a hacer


A la hora de montar nuestra cámara tenemos varias opciones:


  • Fotos o vídeo;

  • grabar siempre o solo cuando haya movimiento;

  • que se guarde en le movil, que nos envíe las fotos o verlo online;


Así pues dependiendo de lo que queramos necesitaremos más o menos:


  • Un teléfono con nuestro sistema operativo móvil favorito: Android;

  • alguna forma de que el teléfono se quede fijo apuntando hacia donde queremos, si se mueve no funcionará la detección de movimiento;

  • un cargador para el móvil ya que grabar consume bastante batería;

  • la app SECuRET SpyCam, que cuesta unos 4€;

  • conexión Wi-fi para el teléfono;

  • la app IP Webcam, gratuita;

  • un lugar desde donde visualizar el streaming de la cámara (opciona)


Antes de que alguien se queje por los 4€, el motivo de usar esta app y no otra es la posibilidad de que la granación se active ante el movimiento en lugar de siempre. La verdad es que considerando lo que se gana y lo que cuestan las cámaras de seguridad normales, 4€ es más bien poco.


Configurara Securet


secure_cam


Securet es un app de las más completas que he encontrado. Además de la detección de movimiento incluye opciones de aviso por correo electrónico y Twitter así como sincronización vía Dropbox. Con esta app podremos grabar tanto vídeos cortos como fotos. Si aún no os fiais de gastar los 4€, podéis probar la versión demo gratuita de 5 minutos para trasterla un poco.

La configuración es muy sencilla, pudiendo elegir entre vídeo y fotos, resolución, retardo… En general todas las opciones están explicadas, eso sí, en inglés. Además hay varias opciones muy a destacar:


  • Compartir, podemos sincronizar con Dropbox o poner que nos envíen cada captura hecha.

  • Seguridad, Podemos definir bloqueos extra para la aplicación y esconder las capturas.

  • Ajustes avanzados, que incluyen desde como vemos la app hasta donde guardar las imágenes.


secure_1


Una vez hechos los ajustes que prefiramos, empezamos a grabar. Veremos entonces como el teléfono toma “medidas” de la imagen actual y detecta cualquier cambio. Aquí entra en juego usar algo para que el teléfono quede bien fijo. En cuanto ocurra un evento, el teléfono empezará a grabar o hacer fotos. Si lo hemos configurado podremos recibir esas imágenes en nuestro correo o Dropbox.


IP Webcam


ip_webcam1


Lo único que se le podría pedir a Securet es streaming. La aplicación cubre todo lo necesario para una cámara basada en movimiento pero no dispone de esa opción. Ahí es donde entre IP webcam. Se trata de una app distinta pero que permite combinarse con la primera para poder consultar en cualquier momento lo que ve nuestro teléfono.

De nuevo solo hay que instalarla y configurarla. La configuración es sencillísima aunque cabe destacar la posibilidad de marcar un usuario y contraseña. Poner usuario y contraseña es muy importante ya que esta cámara funciona por red, por lo que cualquiera con acceso a la red puede llegar a verla si no ponéis esto. También os recomendaría que pusierais la opción de stream on boot, es decir que si se apaga, nada más encenderse empiece el streaming de nuevo.

Una vez configurada debemos conectarnos vía navegador, Skype o con un reproductor a la dirección IP que nos indiquen. Finalmente podemos lanzar la app a que funcione de fondo pudiendo compaginarla con Secure. Y ya está vuestra cámara de seguridad, con detección de movimiento y streaming. No nos hacemos responsables de los usos que le déis a esta posibilidad, aunque si nos interesa que nos dejéis en los comentarios como os ha ido si probáis el tema.


Aplicación en Google Play


Aplicación en Google Play


Fuente|Howtogeek


El artículo Transforma tu Android en una cámara de seguridad se publicó en El Androide Libre (El Blog Android de referencia. Aplicaciones, noticias, Juegos y smartphones Android Libres)


via Jonathan's starred items in Google Reader

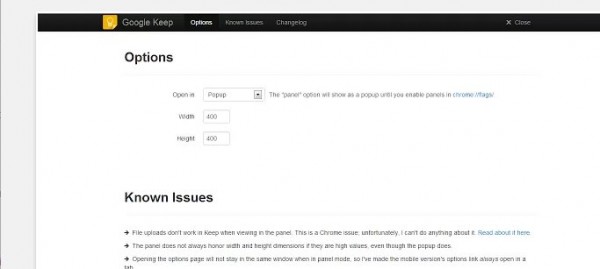
Google Keep en un panel o pop-up de Chrome

googlekeep


Se podía intuir que una extensión de Google Keep para Chrome no tardaría demasiado en aparecer, y, aunque con versión-extensión no oficial, ya nos ha llegado a la Chrome Web Store.


Dicha extensión para Google Keep nos abrirá un panel aparte, siempre accesible desde cualquier ventana del navegador, en el cual podremos añadir notas directamente, visualizar lo que hemos añadido anteriormente y borrar o editar cualquier parte del contenido. En caso de que no nos acabe de gustar el panel independiente como acceso a Google Keep, podremos elegir abrir el servicio en forma de pop-up o en una nueva ventana del mismo navegador.


Para acceder a nuestras notas de Keep desde Chrome y cargar toda nuestra información tendremos que estar registrados con nuestra cuenta de Google, y una vez identificados podremos editar, añadir color a las notas, realizar búsquedas y acceder a notas archivadas.


La extensión está disponible en este enlace a la Chrome Web Store, que, una vez instalada, estará disponible desde el mismo menú del navegador.


Texto escrito en wwwhatsnew.com


Sigue las noticias por twitter.com/wwwhatsnew, Facebook.com/wwwhatsnew o Google Plus.


via Jonathan's starred items in Google Reader

Demographics Pro, analizando la audiencia en Twitter

demographics


De la mano de Schmap, que ya nos ofrecía la oportunidad de conocer mejor el comportamiento de nuestros seguidores en Twitter con Know Your Followers, nos ofrece ahora un nuevo servicio con funciones mejoradas llamado Demographics Pro.


La finalidad de este nuevo proyecto no es otra que darnos información sobre los usuarios que siguen una cuenta de usuario determinada o que se encuentran comentando un hashtag en concreto, desplegando los datos a nivel demográfico como el nombre del servicio indica.


Así pues, Demographics Pro nos facilitará datos como los usuarios reales que nos siguen en Twitter, los que son hombres, los que son mujeres o incluso datos como dónde les gusta comer, dónde compran o cuánto cobran de media, incluso es capaz de especificar a qué se dedican profesionalmente bien indicando el puesto o el sector en porcentajes. Tendremos páginas y páginas de datos que nos darán información sobre etnia, localizaciones, intereses, etc, todo utilizando el algoritmo creado por Schmap. Por último, no sólo podremos crear datos a partir de cuentas individuales sino también desplegar los datos relacionados con grupos determinados o que discuten distintos temas.


Más allá de explorarlo por curiosidad, Demographics Pro puede resultar muy útil para campañas de marketing en las que se quiera analizar a distintos grupos de clientes potenciales o en las que se quiera investigar sobre los actuales trends, creando un resultado a partir de los datos investigados.


Texto escrito en wwwhatsnew.com


Sigue las noticias por twitter.com/wwwhatsnew, Facebook.com/wwwhatsnew o Google Plus.


via Jonathan's starred items in Google Reader

How to Use an Android Tablet


An Android tablet manufactured by Sony


Android tablets are easy-to-use devices that can be used for multiple purposes like: checking e-mails, playing games, watching videos, listening to music. It can also be used as a camera or camcorder. However, an Android tablet is a bit different from an Android mobile phone. Not only are the hardware specifications different, the user-interface is different too.

Edit Steps


  1. Set up your Android. While the OS is very easy to use, you'll need a Google account to download apps via the Google Play Store.

  2. Understand the functionality of the three-basic touch-capacitive keys. These basic control keys are used for controlling applications and other basic commands:

    • The home button: This is used to jump to the home screen of your Android device. If pressed in between another activity (game, or application), the OS puts the activity in the background. Using this button will, usually, not shut down any application or game; instead, it will run in the background.

    • The back button: This is used to go to the previous page or activity.

    • Multi-tasking button: Android tablets running Ice Cream Sandwich (4.0) and higher will have a multi-tasking button (parallelogram-shaped button). Tapping this button will give a list of all applications running in the background. Swapping a running application to the left or right (in the multi-task screen) will close the application. This is particularly useful to clear RAM and speed up the device.

    • Older Android tablets may have an Menu (or settings) button (represented by three parallel horizontal lines). This button gives the user access to additional options for particular apps. This button is not found on devices running Ice Cream Sandwich or Jelly Bean out of the box.


  3. Check the version of Android your tablet is running on.


    Check the version of Android your tablet is running on. Different tablets run on different versions of the Android OS. The Android version can be found in the About Phone section of the settings panel.

    • Most tablets run on Android Ice Cream Sandwich (4.0) or higher.[1] The latest version of Android is Jelly Bean (4.2.2). Generally, the higher the version of Android, better will be the device performance.

    • Some older tablets run on Android Honeycomb (3.x). Honeycomb was a tablet-specific version which wasn't available for mobile phones running on Android.

    • The OS version gives a brief idea of the features packed in a tablet. For example: Tablets (and phones) running on Jelly Bean version have Google Now[2] (voice-assistant service by Google) in-built.


  4. The Play Store application icon on an Android device


    Download applications. Google Play Store has a vast collection of tools, applications and games that will make your Android experience much better.


  5. Customize your Android. Google's open source[4] Android OS gives you the power to customize your device.

    • Make custom Android smart actions. Setting up smart actions will carry out specific activities when specific conditions are met. Smart actions can be customized to suit your needs. Note: Smart actions may not be available on all devices. However, you can download similar apps from the Google Play Store.

    • Adjust Screen Timeout. The screen timeout time can be a drain on the battery, especially if it is too long. Setting up a screen timeout is the one of the best ways to save power while your phone is on.

    • Create your own wallpapers, widgets, etc.


  6. Speed up your device. Speeding up your device can be done in a number of ways[5] :


    • An OTA (Over The Air) software update option, found under Settings > About phone > Software Update > Update


      Update your version/ firmware. Device manufacturers roll out updates occasionally to fix bugs, reduce lags, and improve performance. Be on the look out for updates for your device.

    • Download a task-killer and anti-virus applications. Some devices come with an in-built task manager while most don't. Task manager will allow you to close the apps that are running in the background (and use up RAM). Anti-virus application will keep you safe from any external threats.

    • Remove unneeded widgets from the home screen. Widgets are useful to quickly access important apps or get information. However, unneeded widgets use up a lot of processing power and will slow down your tablet.


  7. Configure Sync options. Syncing is an efficient way to transfer data like pictures, videos, contacts, messages, emails, and more, between many devices (including your PC). To configure synchronization options for apps or accounts, go to Settings -> Accounts & sync.[6]

    • Sync your Gmail emails, contacts, calender with Windows Outlook or other accounts.[7]

      • Set up Gmail in Microsoft Outlook. Set the server type to IMAP. Set the incoming mail server to imap.gmail.com and outgoing mail server to smtp.gmail.com. Enter log-in information (Gmail username and password). Under "More Settings", open the Advanced tab. Set incoming server to 933 with SSL encryption and your outgoing server to 587 with TLS encryption.[8]

      • Set up Gmail in Mozilla Thunderbird. Mozilla Thunderbird is a cross-platform open-source email client. To set up Gmail in Thunderbird, first, enable IMAP in your Google account settings. Open Thunderbird and go to Tools -> Account Settings. Add a new mail account; and input your name, email-address and password. Thunderbird will automatically try to configure your Gmail account for Thunderbird.[9]


  8. Back-up your data. Back up your data to your computer, mobile phone or an external storage. You can also try backing up on the Google Cloud.


Edit Tips


  • Set up a maze lock (if your device supports it), for additional security. To set this up, go to Settings --> Location & Security.

  • Try downloading a file manager that will allow you to access external storage easily.

  • Switching off your device completely will clear temporary data and the device will run faster.


Edit Warnings


  • The path for setting up the steps might vary, depending on your manufacturer and Android version.

  • Installing Custom ROMs might give you additional features, but they will void your warranty and could affect the device's performance. If this is not done correctly, it could cause irreversible damage to your device.


Edit Things You'll Need


  • Android tablet


Edit Related wikiHows


Edit Sources and Citations


Article Tools


via Jonathan's starred items in Google Reader

How to Organize a Book Collection

Are you a book lover? Do you have more books than available bookcases? Do friends jokingly call you "Bookworm" or "Bibliophile"? It's great to have lots of books but it's not so much fun tripping over them or never being able to find exactly the one you want. To ensure that your books are kept in fabulous order and can always be found when you want them, here are some simple but effective ways to organize your book collection.


Edit Steps


  1. Determine how you think of books. Do you categorize them by story type, color, size, genre, title or author? There are as many ways to organize books as there are people. What really matters though, is that you pick the method that appeals or makes the most sense to you. By doing so, this will trigger your memory and help you to locate the book you want quickly.


    The following sections set forth various tried-and-true methods for organizing a book collection; it's recommended that you pick the approach that appeals to you the most.


Alphabetical Division


  1. Shelve all of your books alphabetically by author or title. This method will work well if you're good at remembering titles or names. Putting books by the same author together helps you find a book in a series easily.

    • This method is less successful if you're the kind of reader who remembers content but can barely recall the name of the author or the book. In such a case, you'll need to try a different approach.

    • Alphabetical division may also need to take into account fiction and non-fiction division (see Subject Method below for more suggestions).


Size or Color Organization


  1. Place the books on the shelf according to size. It is best to put larger, heavier books on lower shelves and smaller, lighter books on higher shelves; this is a basic principle to ensure that you stabilize the bookcase. This method is visually appealing and appears neat, as there is a size order. If you remember books by their size or shape, this method might be just right for you.


    This bookshelf shows an array of ideas for keeping like sizes together.


  2. Sort books by color. For some people, the book's color or colorful style/depictions on the book's cover is highly memorable and instantly draws you back to each and every book read. And if you love arranging things by color in your home, this could be a great decor statement as well as an easy to way to retrieve your books.


Subject Method


  1. Sort your books by topic. This means dividing the books into what you see as distinct topics, such as placing all the romance books in one pile, all the science books in another, philosophy, biographies, how-to manuals, etc. into another pile.

    • Consider dividing fiction and non-fiction. You might like to make a distinction between fiction and non-fiction books––this method tends to encourage this division naturally. Such a division can be done on the same bookshelf, for example by placing all fiction novels on the top shelf and all woodworking manuals on the bottom shelf. Or it can be done by using different bookshelves across the house, for example, keeping cookbooks in the kitchen and romance novels in the bedroom.


  2. Determine the shelf space required for each topic. It's always wise to assume you need more space rather than less, since it's likely you'll add to your collection over time and somehow, stray books will always turn up in need of shelving!

  3. Place the books by topic selection on the shelves, together with others of their genre. In some cases, as shown in this image, you might like to add some relevant items to the shelf as well, such as figurines, photos or collectibles.

  4. Choose an identifying mark for each subject or genre. This method is optional if it's already easy for you to remember where you've placed the books by topic. But if you need to further clarify the topics, some easy methods to adopt include:

    • Colored Stickers: Choose stickers with permanent adhesive from a library supply company, or be prepared to cover the sticker in permanent tape. Avoid packing tape and scotch tape as they yellow, crack and peel, while duct tape becomes gooey over time.

    • Colored Cloth Tape: Permanently adhesive colored tapes work very well for this task.

    • Written symbols: Use a permanent marker to write a letter(s) or identifying mark for each subject or genre. For example: "R" for Romance, "M" for Mystery, "R" for Religion, "B" for Biographies, etc. Unfortunately, not all books are the same color, so what shows up well on one cover may not show up at all on a different color; as an exception for books that use the same color as your label, consider opting for a white label and use marker in the chosen color.

    • These are great to use if you move frequently and need your book collection to stay relatively intact when packed.


Desktop Organization


  1. If you keep a book collection on your desk, organizing it can help make your work or study more effective. Take a look at what books are currently sitting on your desk.

    • What sorts of books do you consider necessary for a desk book collection? Usually it will be books you need to reach for almost every time you're at your desk, such as dictionaries, reference manuals, computer troubleshooting manuals, guides for writing, editing or calculating, books that are currently important for an essay/report/book you're preparing, etc. Books that are not likely to be as necessary could include manuals you'd check no more than once every few months, novels you're meaning to get around to reading and books that are more interesting than what you're supposed to be getting on with! Remove anything that isn't in frequent use or is serving as a distraction.


  2. Use a very small part of your desk for your book collection. The basic rule of books on a desk is to keep them to a minimum. The desk is an area for papers, the computer and spreading out open books that are in use. Anything else is extraneous and risks getting in the way, especially with a small desk.

    • Ideas for shelves on or near desks include: a small portable shelf that can be picked up by hand with the books still on it; books held upright between portable bookends; shelving hanging above the desk on the wall; or simply leaning books up against the wall if the desk sits against a wall.


  3. Arrange the books according to frequency of use. Put the most used as near to your reach as possible, and the lesser used but still useful ones can be placed further away from where you're seated. Keep it simple.


    • Get into the habit of always returning books to their proper shelves after using. Books piling up on a desk can demotivate you from getting back to study or work and isn't very organized.


Edit Tips


  • Invest in good quality bookcases. Your books will benefit from bookcases that are clean, don't bow under the weight of books and are not damp or moist. Dust bookcases regularly.

  • Invest in good quality books. When given the hardcover or softcover choice, always buy hardcover. It will last much longer and it retains its value better too, on the off chance you want to resell it some day.

  • Invest in book protection and repair supplies. Slipcovers or dust jackets keep books clean and in good repair.

  • Invest in good book organizing software and create the catalog of your collection.


Edit Warnings


  • Use only library quality repair supplies if you want your books to last. Using scotch, packing, or duct tape on a book will ruin the book for long term use.


Edit Things You'll Need


  • A book collection


Edit Related wikiHows


Article Tools


via Jonathan's starred items in Google Reader