30 de junio de 2013

Una manera simple de aplicar filtros y efectos a nuestras fotografías desde Chrome


Opciones para darle un toque diferente a nuestras fotografías no nos faltan, pero si buscamos una solución rápida desde nuestro navegador, podemos tener en cuenta a Foto Rulez Es una aplicación para Google Chrome que nos permite tener a disposición más de 40 filtros y efectos para aplicar tan Fuente

Surfmark – Captura, comenta, organiza y comparte las páginas que visitas -

surfmark

Es claro que a la hora de realizar una búsqueda en la web sobre algún tema específico, desde temas académicos hasta las mejores tiendas para conseguir determinado producto, son decenas las páginas web que se abren y cierran durante la navegación, muchas con contenido valioso que en una nueva búsqueda pueden no aparecer por lo complejo de recordarlas todas.

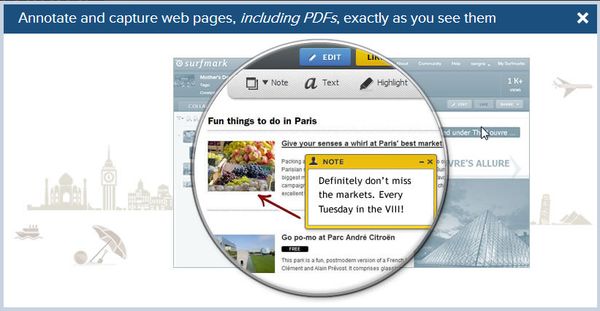
Pues bien, Surfmark es un servicio web con una extensión para Firefox y Chrome que permite capturar las páginas web mientras se navega para luego organizarlas en tableros al estilo Pinterest. Sin embargo la idea no es guardar capturas de pantalla sino guardar las páginas completas de manera similar a Evernote pero contando con más opciones de edición: notas emergentes básicas, resaltado de texto con colores diferentes, trazos libres, marcos con anotaciones para destacar secciones y varias más.

Al instalarle aparecerá un botón en la barra de extensiones del navegador que al oprimirlo desplegará las opciones de captura y edición disponibles que luego de ser ejecutadas mostrarán una ventana para seleccionar el tablero donde se guardarán y algunas etiquetas para organizarle mejor. Algo útil es que la barra de herramientas desaparecerá sólo hasta que se vuelva al pulsar el mismo botón así que lo único que hará falta para agregar una nueva página será pulsar en el botón “Save”.

El servicio es gratuito y es posible registrarse mediante Facebook o Google+. Vale resaltar que la ventaja de capturar las páginas web completas es que los tableros se pueden compartir permitiendo la edición por parte de otros usuarios (por ejemplo, los compañeros del grupo de estudio) además de que pueden visualizarse en modo presentación con las típicas flechas de navegación.


Fuente

29 de junio de 2013

How to Refinish Wood Floors -

Under old, soiled, dirty carpet may be a beautiful wood floor screaming to be reintroduced to your home. Coating your floors with a clean, new finish is about as satisfying as it gets. A little hard work and you could have the hardwood floor you've always envied in the homes of others.


Steps


Prepping Your Floor for Refinish


  1. Remove any carpeting from the area. Cut and roll in sections manageable for carrying out to the trash. Once all carpeting has been removed, move on to the real work.


  2. Hammer down any protruding nail heads. Nails may have been added to the flooring to cut down on squeaking or to secure a loose baseboard. Either way, nails that are sticking up above the wood floor present both a danger and a nuisance. Most of the time, hammering the nails down deeper into the flooring is a better and easier solution than taking the nails out.


    • Hammer the nails down about 1/4 inch into the floor. Use a nail set so you don't leave hammer marks(dents)in the wood. Work with their direction, not against it. Once the nails are 1/4 inch deep, they're ready to be concealed with a little bit of filler that you'll make after sanding down the rest of the flooring. More on that later.

  3. Make sure the floor is relatively clean. If old carpet backing is stuck to your wood floor, you will need to scrape it off with a putty knife. This can be a rather tedious job, and can take a great deal of time, but it's worth it.


    • Go over the floor with a vacuum and mop if necessary. Years of dust and grit can create a lot of debris. You want this debris cleared away before you attack the old wood finish.

  4. Remove any tack stripping along the floor edges. If tack stripping was present along with your carpet, remove it before you start sanding so that you can hit those areas with your finish.


Removing the Old Finish by Sanding


  1. Use sanding to buff up any very old, excessively scratched or worn wood. Chemical strippers can be used if what you're after is a quick fix, or the floors themselves were recently finished. If, however, you're dealing with traffic patterns, stains, or scratches, your best bet is to sand away those imperfections and then add another coat to the floor.


  2. Prep the perimeter. Hand-sand or palm-sand the perimeter of the floor with coarse 180-grit sand paper. Rub out 4 to 6 inches from the edge of the baseboard so that you're sure to cover the areas your mechanical floor sander can't get to.


  3. Use a floor sander to hit the areas of the floor that weren't hit by hand in the detail sanding. You can rent floor sanding machines at hardware supply stores or equipment rental stores.


    • Start with a coarse grit and begin to sand the floor. Start off gently. You don't want to gouge the floor. If you get a good sander, you'll even be able to lift up the sander and spend a little more time on heavy-wear or problem areas. Change out your sanding disks as necessary. You may need to change out the sand paper once or twice using the same grit before you've completely removed the finish.

    • Using a pencil, color the entire area lightly with streaks of graphite. This will help tell you when you've sanded an area. Otherwise, it'll be tough to tell where you've sanded and where you haven't.

    • Go over the entire floor again with a medium-grit sandpaper. Look at the pencil streaks to determine whether you've already sanded an area or not. Again, you may need to change the disks on your sanding machine before the job is finished.

  4. Save the sawdust created by sanding. If you hit any wayward nails back into the floor in the prep stage, be sure to save the sawdust so that you can patch and plug the 1/4 inch holes created by the nails. This will help ensure a nice, even finish.


Removing the Old Finish with a Chemical Stripper


  1. Use a chemical stripper in lieu of sanding. If you want a quick fix, or the wood underneath the old finish is clean and scratch-free, you may want to use a chemical stripper instead of sanding down the whole floor. If you choose to use a chemical stripper, always follow the instructions on the label and use proper safety precautions.


    • Use gloves, goggles, and be sure to ventilate the area you're working in. Chemical strippers are designed to peel off the finish from wood; you don't want it interacting with your skin, and you don't want to inhale too much of it.[1]

  2. Apply the stripper on an area of about two square feet. Don't be timid about applying too much of it. You also don't want to cover too much of an area at once as you will want to be able to clean the area in plenty of time.


  3. Let stripper sit for about five minutes. Once you've applied the stripper to the finish, let wait the suggested time without interfering. You will notice the old stain bubbling and lifting from the wood.


    • Don't wait so long that the stripper dries on you. When you remove the stripper, you want it to still be wet.

  4. Remove the stripper from the wood. You can do this in two steps:


    • Hit the area with a putty knife to scrape off the stripper along with the finish.

    • Use denatured alcohol in a disposable aluminum pan to clean off the remaining stripper with the help of steel wool. Do not put too much denatured alcohol in the pan, as it does tend to quickly evaporate.

  5. Follow manufacturer's instructions for cleaning the stripper from the wood. Different chemical strippers will need to be cleaned using different methods. Some strippers need to be cleaned with turpentine or paint remover, while others can simply be rinsed with water.


  6. Allow the area to dry completely. Water or moisture and your new finish don't work well together; be sure to allow the area to dry completely before moving on to the next step.


  7. Spot-sand any scratched or worn areas. You may need to sand any problem areas before you apply the new finish to your wood floors.


Applying the New Finish


  1. Plug any remaining holes with wood paste or wood plugs. May you had a few cables running into the baseboard; or perhaps those nails we talked about earlier are in need or covering up.


    • To make a wood paste, mix sawdust with a small amount of white glue to create a paste. Apply paste over the nails with a putty knife and allow to harden before sanding flush with the rest of the floor.

    • Find small wooden plugs for larger holes. If necessary, drill into the floor to enlarge the hole so that the plug will fit nicely inside. Apply a small amount of wood glue around the side of the plug, fit the plug into the hole so that the grain of the plug and the grain of the floor match well, and hammer down lightly. Allow to dry completely before sanding flush with the rest of the floor.

  2. Before you apply any finish, be sure to vacuum and/or clean up any debris. You want your entire floor cleared of any sawdust, debris, or stripper before you apply the new coat. Make sure also that your floor is completely dry before applying the new finish.


  3. Once the floor is ready to be refinished, apply the stain or finish of your choosing evenly onto the floor. Make sure that before you actually start to apply the coat to your floor, you have the windows open for ventilation, you're wearing a mask to keep the fumes from bothering you, and you've spot tested the finish so you reasonably know what it's going to look like on your floor.


    • Also use gloves and a synthetic bristle brush when applying the finish. Start with the perimeter of the floor and work your way in. A 3-inch band is all you'll need for a perimeter.

    • Use an applicator pad to do most of the work for you. You can use a watering can with a bit of cheesecloth on top to pour the finish onto the floor, and then use your applicator pad to mop the finish into the floor evenly and cleanly.

    • Make sure that you leave yourself an area to exit once the finish has been applied. You don't want to have to walk over the newly-stained floor with your dirty shoes when you want to let the finish dry.

  4. Wait for the finish to dry and, if necessary, apply another coat of stain or finish to deepen the color. Use the same techniques as described above, and be sure to take proper safety and handling guidelines into consideration.


  5. When dry, finish with a polyurethane coating, if desired. It is much easier to use a long-handed roller rather than a brush, and it gives a nicer finish. It is important to lightly sand after each application with 220 grit sandpaper. Clean after each sanding with tack cloth. It may take 24 hours between applications for the polyurethane to dry.


Fuente

How to Relieve Stress -


Stress. We all deal with it. Whether it be our jobs, family life, drama with friends, a relationship problem, or finances, stress is there. While a little stress is probably good for you, it's the excess that does the harm. But there are ways of relieving it or destressing.


Steps


Help Relieving Stress


Quick Stress Relief


Feeling like stress is about to sink you, right now? Try this approach for rapid relief:


  1. Breathe deeply and calmly. Sit down somewhere peaceful and take deep breaths over at least five minutes. Every time your mind wanders, return it to focusing only on the deep breaths. Inhale, exhale, inhale, exhale, repeat this until you feel calmer.

  2. Smile. Your body has a ready-made fix-it solution for when you feel overwrought and it is as simple as changing your physiology. The smile is the simplest way to do this. Plaster on a fake grin and keep it there for a few minutes. You'll feel your mood begin to upturn with your grin.

    • Sit up straight, push your shoulders back or stand tall. Realigning your posture into a positive mode will help to decrease stress. Look up instead of curling your chin and face downward.

    • Change your expression. As well as grinning, also think about smiling with your eyes and presenting a lighter facial expression.

  3. Visualize. You are stressing right now because you're focusing on the problem. Focus on resolving it instead. Think about how things will be when it is completed/fixed/stored away/whatever. Try to "float" through the current problem, telling yourself it is a temporary hitch or issue that will be resolved.


  4. Exercise. Leave your desk, couch or bed and get out there. Go for a run, a swim, a circuit in the gym. Do whatever gets you moving and out of the sitting and contemplating position. The beauty of exercise is that it gets your adrenalin moving for something positive instead of chewing over worries and you can still think about things, probably all the more clearly!

  5. Organize. In a mess? Start tidying it in small amounts. Move one little pile of papers, open one bill or wipe down one bench. You can start, you don't need to finish. But remember, it's getting started that matters above all and the motivation will sprout from that tiny beginning.

  6. Breathe. Return to deep breathing in a calm spot whenever you feel overwhelmed again.


Understanding Stress Relief Methods


The quick-fix methods above all have reasons behind them, which are explored a little further in this section.


  1. Stop shallow breathing. Taking a deep breath is an immediate defense against stress. If you can get in the habit of realizing your stress level rising and take a deep breath every time you feel stress beginning to take hold, this will slow down everything within and helps to put a stopper on your flight or fight adrenalin rush.


    • Sighing is not breathing. It is a surrender to feeling overwhelmed, or a passive aggressive nudge to someone else that you've had it but you're not prepared to express that more clearly. Deep breathing is about stopping what you're doing, finding somewhere away from the hubbub and self-calming in a regulated and self-caring manner.

  2. Talk about your feelings or express yourself. Much stress arises because of a tendency to shoulder responsibilities, burdens and heavy workloads without discussing the consequences or feelings that arise from this weight. Important outlets for relieving this build-up of internal tension include:

    • Talking to others. Whether you talk to a friend or talk to yourself, getting concerns off your mind will help a lot.

    • Writing it down. If you don't feel like talking about it, write it down. Keep a journal and write down whatever it is that's bothering you. Writing is a therapy of its own. Indeed, for many, a journal is a great way to document how you are thriving or declining mentally over the years and enables you to pick up errors in your thinking.

  3. Laugh more often. As we age, we tend to laugh less and get caught up in taking things a little too seriously, ourselves included. Take a leaf from the carefree and unrestrained laughter of childhood, in which laughter is genuine, spontaneous and frequent. As an adult, you may not feel like laughing, but rest assured that even forced laughter can help as a nudge to feeling better and will soon change into genuine laughter, the more you practice it. Ways to get your jollies up include:

    • Crack some jokes. Find genuinely funny jokes, practice them, then share them. The internet exists now, so no excuse for not finding genuinely funny, harmless jokes.

    • Do your goofiest impression. Something going wrong? Represent your frustration by contorting your face as crazily as you possibly can. Think of a cartoon character, then go for it.

    • Watch funny stuff. Invite friends and grumpy coworkers over to watch it with you. Have everyone in stitches by the end of the comedy fest.

    • Look backwards. In your mind's eye, go to this time tomorrow, next week or next year and look back. Is what is happening now worth the stress? What's funny about it in hindsight? See your future self retelling this episode to friends.

    • Use your common sense of proportion. Obviously not everything is funny but equally, don't take everything too seriously.

  4. Use fitness as a stress reliever. Perhaps your health and appearance are stressing you out, but even if they're not an issue, being physically fit can directly help relieve stress, which exists on both a mental and a physical level. Sometimes there's nothing like a long run, an intense yoga session, or a fresh swim after a stressful day to help you feel relaxed and stress-free again. Also, exercise releases endorphins; a feel good hormone.

  5. Be better organized. For the most part, stress arises from feeling overwhelmed. Use a planner to keep track of your "to do lists". There's just too much to do, and not enough time to do it. Being organized and getting your priorities straight can help you break responsibilities down into manageable pieces and focus on the things that really matter to you, rather than getting caught up in details and creating extra work for yourself--all of which leads to more stress.


Other Ways to Relieve Stress


Besides the useful ways outlined above for relieving stress, there are numerous other approaches that can help minimize the impact of stressful situations. Just a few are presented here:


  1. Soothe the senses. Invoking all of your senses in relaxing, uplifting ways can help calm your soul and relieve stress. Here are a few ideas to get you started:

    • Light a scented candle that has a calming fragrance like lavender.

    • Listen to your favorite, most relaxing music or, better yet, go somewhere that you can listen to wind rustle through trees or waves crash on the beach.

    • Enjoy the scenery, whether you're outdoors or viewing an art exhibit.

    • Drink some warm tea or taste--really taste--some dark chocolate.

    • Treat yourself by getting a massage or, if you want to be alone, take a bath (bubbles are recommended)

  2. Be aware that you always have a choice. You have a choice to be worried or a choice to not worry––either way, things won't change unless you actively do something. Worry never changes a thing! You also have choices about how you react to situations, how you interact with people and how you live your life. While it may feel as if you don't have many choices, often this is a false perspective. Break down your current situation into smaller pieces and work out how you can make beneficial changes to your life that are based on your choices rather than on living up to other people's demands.

  3. Learn to say no. You cannot do everything you are asked, so why keep pretending that you can. Being lovely, nice or helpful doesn't rest on never saying no! Indeed, the more you promise and don't deliver, the less people will perceive you as being nice; rather, they'll consider your supposed largesse a nuisance, knowing that you'll drop the balls at the last minute. Instead, be assertive and learn to say no politely but firmly and always when you know there isn't a chance at all that you'll get the thing done.

  4. Learn how to delegate. As with trying to be all things to all people by never saying no, never delegating is about you trying to have control and not trusting that others can do their job as well as you can (be it laying the table, washing the whites or staging a corporate takeover). Learn to let go by giving more credence to the abilities of others. And yes, expect a few stuff-ups but have faith in other people to deliver on most things you ask of them. If you're a perfectionist, it's probably right that you can do some things better but learn which battles to fight and which to leave, especially those where "near enough" will do. This way, you'll find more time to do what you really are about and less stress as a result.

    • Surround yourself by people who can do things better than you. Don't be threatened by this; instead, use it to get rid of the worry they'll stuff up and to give yourself more space to pursue the things you're really good at doing instead!

  5. Be thankful. Gratitude does wonders for your state of mind. Notice what you have rather than what you're missing and notice the good that others do around you instead of all their faults. Notice your own good too.

  6. Say sorry and accept responsibility. If you need to apologize to someone, and doing so will not make the situation worse, find a way to do so. More importantly, learn to forgive, particularly to forgive yourself. Guilt adds pain to stress. And accept responsibility instead of seeking to spread blame. Stress usually results from holding grudges against others long term; this hurts you, not them.

  7. Try rational emotive behavior therapy (REBT). This teaches that it is not what happens to you, but what you believe about what happens to you that makes you stressed and depressed (Ellis, 1975). You can do a lot to get rid of these feelings on your own by finding the irrational ideas which produce them, and debating with yourself until you have cast them out. Here is Ellis's list of potential culprits; if you have any of these thoughts floating around your mind, challenge them to help bring about a sense of peace:


    • I must be perfect in all respects in order to be worthwhile.

    • I must be loved and approved of by everyone who is important to me.

    • When people treat me unfairly, it is because they are bad people.

    • It is terrible when I am seriously frustrated, treated badly, or rejected.

    • Misery comes from outside forces which I can't do very much to change.

    • If something is dangerous or fearful, I have to worry about it.

    • It is not easier to avoid life's difficulties and responsibilities,than to face them.

    • Because things in my past controlled my life, they have to keep doing so now and in the future.

    • It is terrible when things do not work out exactly as I want them to.

    • I can be as happy as possible by just doing nothing and enjoying myself, taking life as it comes.

  8. Do nothing. That's right, folks, do nothing at all. Close the door, open the window, have a seat, and take a little break from life. If your mind is racing, learn to meditate and just let that stress go. Put aside that puritanical nonsense that idle minds do the devil's work; maybe that was an issue before machines and large-scale agriculture but these days, everyone is doing too much and not enough of too little. And remember, it's okay for you––and your kids––to be bored sometimes. Boredom often gives birth to vivid imaginations and vivid imaginations give birth to ideas that change the world.

  9. Listen to music. Listening to music does wonders and is a great way to relieve stress. Just be sure to sidestep songs that will make you feel worse, like the songs about giving up and fading away. Instead, listen to good songs that put you in a happy mood. Music is a significant mood-changer and reliever of stress.

    • Ocean sounds tend to simulate calmness and serenity so, listening to a sound machine while lying down could help.

  10. Drink plenty of water. If you're dehydrated that can lead to headaches, which just adds to the stress. So relax and get a cup of water. Or a nice herbal tea. Whatever relaxes you and leaves you feeling better.

Fuente

Google Translate

How to Repair Your Credit -


If you're struggling with debt, here are few steps you can take to repair or rebuild your credit on your own before accepting one of the many "debt consolidation" offers or resorting to bankruptcy.

Steps


Using a Budget


  1. Create a budget. Following a budget seems to scare many people, perhaps out of fear of complexity or a fear that a budget curtails spontaneous spending. Budgets are neither hard nor constricting; in fact, a well-laid out and consistently followed budget can give you both peace of mind and freedom to spend more eventually. All you need to do is to get started. There are many free budget tools available online, in software packages and through apps. The simpler the tool, the better for you and the increased likelihood you'll stick with it.


  2. Calculate your income and your expenditures. The best way to figure your expenses is to track your spending for 30 days. Find out how much money is going to leisure activities and going out to eat. Then figure out how much money you can set aside each month to whittle down your debt.


Knowing How Your Credit Stands


  1. Be aware of what's in your credit report. In the United states, by federal law, you can get one copy of your credit report from each credit agency, (Equifax, Experian, and Trans Union), each year. You can get all three at once, or spread them out through the year.


    • Go to the AnnualCreditReport.com website at http://www.annualcreditreport.com. The "free" offers on the web automatically enroll you in a monthly or annual program that costs money, and it's quite a lot for someone who is already in financial trouble.

  2. Review the credit reports for accuracy. It's tough enough paying for your own mistakes; you don't need to be penalized for someone else's. (See Tips, below.)

    • You can also quickly see the two biggest red flags creditors, (and employers, and insurance underwriters, and ...), look for: late or missed payments, (especially recent ones), and maxed-out credit lines.


Sorting Out Repayments with Creditors


  1. Contact your creditors. Preferably, do this quickly, not after months of harassing calls. It is best done as soon as you realize you won't be able to make the requested payments. Most creditors are not as cut-throat as you think, and they will work with you to schedule smaller payments that fit your budget. After all, they'd much rather receive $20 payments for the next year than risk getting nothing in bankruptcy court.


    • This is where having a written budget can really pay off. Tell the creditor that you've worked out a budget, can afford to pay them $X per month or weekly, and offer to send them a copy of your budget. They're much more likely to accept your offer of lower payments if you can show good faith.

  2. Get any agreement in writing. If you are able to negotiate lower payments, interest rates, or balance payoffs, request they send a letter confirming it. Having it in writing is your defense against changing minds, lost records, new management being more aggressive, or any number of other things.

    • Once you pay off your debt, make sure you get a settlement letter. Send a copy of it to the credit bureaus so they can update your credit report.


Removing Temptation and Consolidating


  1. Cut up the cards. Even if you do nothing else, stop charging, and keep paying at least the minimum on everything. Eventually, you will get them all paid off. Keep one card available, but difficult to use, (for example, put it in a bowl of water in the freezer), for those times when you have to have a credit card.


  2. Consolidate where it makes sense to do so. Consider transferring your largest credit card balance (if you have more than one) to a low or zero interest loan until your debts have all been paid off. Avoid consolidating if it means paying a higher rate overall though; do your sums first.

  3. Keep some credit accounts open. Close no more than one or two every six months or so. A sudden burst of activity of any kind reflects poorly on your financial stability. When deciding which accounts to keep open, keep at least the one or two oldest accounts because the third-biggest factor in your credit score is length of credit history.

    • Having five accounts with zero balance on four and $500 on one lowers your credit risk, as opposed to two accounts with a $250 balance each.


Paying Off Your Debts


  1. Pay off your debts. Total debt outstanding constitutes nearly one third of your credit score, so it's time to get your rating restored. Once you've decided how much you can pay against your debts, and negotiated any lowered payments, you must allocate that portion of your budget to each creditor.


    • Pay the minimum (or agreed amount) to each and every creditor, every month, on time.

    • Then pay any extra against the lowest outstanding balance.

    • Each time you pay off your lowest balance, celebrate (cheaply!), then "snowball" your payments onto the lowest remaining balance.


Other Ways to Repair Credit


  1. Get a secured credit card, if you don't have a traditional one, and need to build up your history. You're unlikely to be turned down for one because you supply the money up front as a collateral. If you deposit $300 with the bank, you'll have $300 credit limit on your secured card. Beware of the high interest rate and various fees often associated with a secured card. Pay in full, on time, every month to avoid most of those fees.

  2. Join a credit union. They're more likely to give you loans in the future than a regular bank.

  3. Make all payments on time. Don't arrange a lowered settlement amount you can't pay. It will only reflect badly on your credit. Payment history is the number one factor in your credit score -- over one third of your score.


  4. Avoid bankruptcy if at all possible. Bankruptcy shows up on your credit for 10 years after it has been declared. Don't take the easy way out now, as you'll pay for it later. It takes a lot more hard work and dedication to rebuild your credit than it does to declare bankruptcy, but you'll be glad you did.

  5. Add good credit accounts to your credit files. When you add good credit tradeline accounts to your credit profiles, you increase your credit score. If you add good credit accounts and have even one bad credit account deleted from your credit reports, your credit score could increase by as much as 80 points with just these two actions.


Video

 Tips


  • You can get negative items removed from your credit report if they are inaccurate or incomplete. Write to the credit bureaus and tell them that the items are inaccurate or incomplete and you want them removed. When you dispute a debt the credit report agency has 30 days to receive a response from the creditor to validate the debt. If after 30 days they do not receive a response the Credit reporting agency by law will remove the entry from your report. Remember there are three agencies, so you have to write to all three.

  • You want to show that you are responsible with high balances, so you'll want to have high credit limits but a low balance. It actually helps to have a high balance that you've paid off.

  • Your credit report is your guideline. Each account on your credit report has a rating. A sample credit report will be provided to assist you with reading your report. The rating may change depending on the agency. A letter followed by a number indicates the type of account and the rating. If you have an account that is rated as an I1 that is an individual account that is paid on time. If you have an account that has a J1, that is a joint account. An I5 could mean trouble. Highlight everything that isn't a 1 and everything that is turned over to collections. Make a list on your computer from the lowest amount to the highest. Start with the lowest amount and either pay the debt or dispute it.

  • Many companies report things in error. Maybe your name is spelled the same way as someone else’s or perhaps they didn’t list a payment that was made. The point is errors happen and credit companies must respond within 30 days if you challenge an entry that was made if you think there’s an error.

  • Get a loan from your credit union or banking establishment, then immediately (that day) turn around and open up a savings account. Make payments on the loan from the savings account. Do not use the money for anything else! This will help improve your credit as you pay off the loan. Be advised, however, that the interest you pay on the loan will typically be larger than the interest earned on the savings account. Thus, toward the end of the loan, you will empty the savings account and still owe something. But if you can cover the difference, your credit score should be better as a result.

  • That software doesn’t care if you pay your bill daily, weekly, bi-monthly or whatever – as long as the correct amount of money is sitting on your account by the due date. This is where computers can be fooled into thinking you’re much better with your credit by doing some simple things.

    • Divide your monthly payment into a weekly payment (or fortnightly)

    • Make your repayments more frequently (like weekly or fortnightly)

    • Round your new repayment amount up to the nearest $5

    • By doing these little things, the computer instantly recognizes that you’re paying more than you need to and you’re paying more frequently than required. This can improve your credit score and have the added benefit of making it harder for you to fall behind with payments in future.


Fuente

How to Cite a PDF -

Citing a PDF is as simple as citing any other electronic source, the only exception being that you must indicate the fact that the source was a PDF. In general, PDF files are eBooks or online journal articles. In order to cite the PDF properly, you need to know how to cite eBooks or digital journal articles according to the style method you are using.


EditSteps


Section 1: PDF eBook in MLA[1]


  1. Type the author's name. The name of the author should be in last-name, first-name format, followed by a period.

    • Smith, John.


  2. Write the title of the book. The title of the book must be italicized. Place a period at the end.

    • Smith, John. The Fantastic Novel.


  3. Indicate the original place of publication, the publisher, and the year. The place of publication should be the city and state, unless the city is overseas or well known. A colon should separate the location from the publisher, and a comma should separate the publisher and the year of publication.

    • Smith, John. The Fantastic Novel. London: Great Publishing House, 2010.


  4. Include the electronic publication information if it differs from the original information. The electronic information includes the title of the website the eBook can be found on, which should be italicized, and the date of publication on the website.

    • Smith, John. The Fantastic Novel. London: Great Publishing House, 2010. Google Books, 2011.


  5. Signify that the book is a PDF file. The medium of publication is always specified in MLA format. Here, “PDF” or “PDF file” can be used to specify the medium.

    • Smith, John. The Fantastic Novel. London: Great Publishing House, 2010. Google Books, 2011. PDF.


  6. Specify the date accessed. The date accessed should include the day, month, and year. It should be the date you first accessed the material on.

    • Smith, John. The Fantastic Novel. London: Great Publishing House, 2010. Google Books, 2011. PDF. 1 December 2012.


Section 2: PDF Article in MLA[2]


  1. List the author's name. The name should be formatted in last-name, first-name form and followed by a period.

    • Doe, Jane.


  2. Give the name of the article. The name of the article should be in quotation marks and followed by a period.

    • Doe, Jane. “Interesting Citation Article.”


  3. Include the name of the digital publication. The publication could be an online journal or eBook, but it may also be the name of a website. Simply put, it is whatever website or digital source you got the article from. The name should also be italicized.

    • Doe, Jane. “Interesting Citation Article.” Online Journal of Citation Information.


  4. Write the issue number, if applicable. If you pulled the PDF from a digital journal, the journal will likely have an issue number. The volume is indicated first, followed by a period, which is immediately followed by the issue number.

    • Doe, Jane. “Interesting Citation Article.” Online Journal of Citation Information. 4.7


  5. Follow with the publisher information. This includes the name of the publisher and the year of publication. Note that the publisher name is excluded if the article is pulled from an online journal with an issue number, but the year is still included.

    • Doe, Jane. “Interesting Citation Article.” Online Journal of Citation Information. 4.7 (2006):


  6. Note page numbers, if available. The range of pages on which the article is printed should be included if the PDF was pulled from a larger, numbered publication.

    • Doe, Jane. “Interesting Citation Article.” Online Journal of Citation Information. 4.7 (2006): 82-5.


  7. Indicate that the article is a PDF file. You can use the term “PDF file” or simple “PDF.”

    • Doe, Jane. “Interesting Citation Article.” Online Journal of Citation Information. 4.7 (2006): 82-5. PDF.


  8. List the date the article was accessed. The date should include the day, month, and year.

    • Doe, Jane. “Interesting Citation Article.” Online Journal of Citation Information. 4.7 (2006): 82-5. PDF. 20 November 2012.


Section 3: PDF eBook in APA[3]


  1. Type the author's name and the date of publication. The name of the author should include the author’s last name and first initial or first and middle initial. The date of publication only needs to include the year, and it should be enclosed in parentheses.

    • Smith, J. (2010).


  2. Write the title of the book. The title of the book should be italicized. Only the first letter of the first word needs to be capitalized.

    • Smith, J. (2011). The fantastic novel


  3. Indicate that the eBook is a PDF file. Enclose the words “PDF file” in brackets directly after the title. Follow the closing bracket with a period.

    • Smith, J. (2011). The fantastic novel [PDF file].


  4. Note the URL from which the eBook is available or retrieved. If the eBook is available in print but you were unable to access it in print form, indicate it by using the phrase “Available from.” If the eBook is only available online, indicate it by using the phrase, “Retrieved from.”


Section 4: PDF Article in APA


  1. Specify the name of the author and date of publication. The author’s last name and first initial should be given. The year of publication should follow the name in parentheses.

    • Doe, J. (2006).


  2. Write the title of the article. The title of the article should not be in quotation marks and should not be italicized. Only the first letter of the first word needs to be capitalized.

    • Doe, J. (2006). Interesting citation article


  3. Note that the article is a PDF file. Include the words “PDF file” in brackets immediately after the title of the article. Follow it with a period.

    • Doe, J. (2006). Interesting citation article [PDF file].


  4. Write the title of the journal or publication along with the volume and page range. Each piece of information should be separated by commas, and the title of the journal and the volume information should be italicized. The issue number should be included after the volume number in parentheses. The page range must be followed by a period.

    • Doe, J. (2006). Interesting citation article [PDF file]. Online Journal of Citation Information, 4(7), 82-5.


  5. Indicate where the article was retrieved or available from. If the article can only be accessed online and in PDF form, use “Retrieved from.” If it can also be accessed in print, use “Available from.”


Section 5: PDF eBook in Chicago Style[4]


  1. Specify the name of the author. The name should be in last-name, first-name format and directly followed by a period.

    • Smith, John.


  2. Write the name of the eBook. The title should be italicized and also followed by a period.

    • Smith, John. The Fantastic Novel.


  3. Note that the eBook is a PDF file. After the title of the eBook, indicate that the eBook is a PDF by writing the words “PDF file,” followed by a period.[5]

    • Smith, John. The Fantastic Novel. PDF file.


  4. Follow with the publishing information. The publishing information should include the city where the book was originally published in print, if available, as well as the name of the original publisher, if available. These two pieces of information should be separated with a colon. After the publisher name, type a comma and the publishing year.

    • Smith, John. The Fantastic Novel. PDF file. London: Great Publishing House, 2010.


  5. Include the date accessed and the URL.

    • Smith, John. The Fantastic Novel. PDF file. London: Great Publishing House, 2010. Accessed December 1, 2012, http://www.books.google.com.


Section 6: PDF Article in Chicago Style


  1. Use the author's name. The name of the author should include full names, rather than initials, and should be in standard last-name, first-name form.

    • Doe, Jane.


  2. Write the name of the article. The name of the article must be enclosed in parentheses, and the first letter of each word should be capitalized.

    • Doe, Jane. "Interesting Citation Article.”


  3. Specify that the article is a PDF file. Immediately after the title, type “PDF file” followed by a period to indicate that the article is in PDF form.

    • Doe, Jane. "Interesting Citation Article.” PDF file.


  4. Note the name and publishing information of the journal or publication. The title of the journal or source should be italicized, followed immediately by a non-italicized volume number. Type a comma after the volume number and introduce the issue number with the abbreviation “no.” The year of publication and page numbers the article appears on should also be included, with the year in parenthesis and the page range separated by a colon.

    • Doe, Jane. "Interesting Citation Article.” PDF file. Online Journal of Citation Information 4, no. 7 (2006): 82-5.


  5. Include the date accessed. Introduce the accessed page by typing the word “Accessed” after the page range.

    • Doe, Jane. "Interesting Citation Article.” PDF file. Online Journal of Citation Information 4, no. 7 (2006): 82-5. Accessed November 20, 2012.


  6. Conclude with the URL. Type a period at the end.

    • Doe, Jane. "Interesting Citation Article.” PDF file. Online Journal of Citation Information 4, no. 7 (2006): 82-5. Accessed November 20, 2012. http://www.random-example-URL.com.


Edit Related wikiHows


EditSources and Citations


Article Tools


Fuente

28 de junio de 2013

How to Freeze Eggplant -

Eggplant can be frozen if you intend to cook it after thawing it out. To freeze eggplant, you need to clean it, cut it into slices, and blanch it before placing it in the freezer. Alternatively, you can also freeze baked eggplant or slices of eggplant parmesan. Here's how to do it.


Edit Steps


Part One: Preparing the Eggplant


  1. Select a fresh eggplant. The fresher an eggplant is, the better it will hold up after being frozen.


    • Any eggplant you freeze should be ripe and the seeds should not yet be fully mature. Look for eggplants that have a uniformly dark hue.

    • Do not use eggplants that have soft spots or mismatched patches of color.

    • Traditional black varieties tend to break down less in the freezer than purple Chinese and Thai varieties, but all types can technically be frozen for later use. Just be aware of the fact that the flesh will become softer after being frozen, but this is not usually an issue if you plan on cooking the eggplant after thawing it.

    • If you are unable to freeze the eggplant immediately, store it in the refrigerator until you are ready. The sooner you can freeze an eggplant after harvesting it, though, the better.


  2. Wash the eggplant. Rinse the eggplant under cold running water, scrubbing it gently with your fingers to remove dirt and residue.


    • If you harvested the eggplant from your own garden and have a hard time removing the dirt, you may scrub it gently with a vegetable brush.


  3. Cut the eggplant into slices. The eggplant should be separated into 1/3-inch (8.5-mm) thick skinless slices.

    • Use a sharp knife to cut off 1/4-inch (6.35-mm) from the top and bottom of the eggplant.


    • Use a vegetable peeler to remove the skin. Stand the eggplant on one of its newly cut flat ends and peel the vegetable from top to bottom.


    • Use a sharp knife to cut the remaining eggplant into slices that measure about 1/3-inch (8.5-mm) each.


    • Work quickly, and only cut as much eggplant as you are able to blanch at a time. Cut eggplant will begin to discolor after 30 minutes.


Part Two: Blanching the Eggplant


  1. Boil water in a large stockpot. Roughly 2/3 of the pot should be filled with water. Set it to boiling on the stove over high heat.


    • Give the water ample time to reach a rolling boil.

    • Make sure that your pot is large enough to fit all the eggplant you've already cut up. You can blanch the eggplant in batches if you do not have any stockpots large enough to fit all your eggplants, but you should only cut up as much eggplant at a time as you can blanch in one batch.


  2. Add lemon juice to the boiling water. Pour 1/2 cup (125 ml) of lemon juice into the water for every 1 gallon (4 liters) of water used.[1]


    • The lemon juice prevents the eggplant from discoloring and does not dramatically affect the taste of the eggplant.


  3. Prepare a large bowl of ice water. The bowl of water should be about as large as the stockpot used to blanch the eggplants.


    • Use a tray or more of ice to make sure that the water is plenty cold.

    • Make sure that the cold water is ready before you begin blanching the eggplant.


  4. Blanch the eggplant. Place the eggplant slices in the boiling water and blanch them for 4 minutes.


    • Blanching destroys enzymes in the eggplant that cause the vegetable to break down over time. If you do not blanch the eggplant, it will begin losing nutritional value, color, and flavor within a month, even if you freeze it.

    • You can safely use the same water to blanch multiple batches of eggplant up to five times. You may need to add more water and lemon juice as the water level dips, however.


  5. Quickly transfer the eggplant to the ice water. As soon as the eggplant has been blanched, use a slotted spoon to remove the slices from the boiling water and dunk them into the ice water.


    • By rapidly cooling the eggplant, you stop the cooking process.

    • Allow the eggplant slices to sit in the ice water 4 to 5 minutes or until cold to the touch.

    • Add more ice and water to the bowl as necessary to maintain the right temperature.


  6. Drain the eggplant slices. Remove them from the ice water with a slotted spoon and drain them in a colander or on several layers of clean paper towels.


Part Three: Freezing the Eggplant


  1. Place the eggplant slices in a freezer-safe container. You can either use a freezer-safe plastic resealable bag or a freezer-safe plastic container.


    • If packing the eggplant in freezer-safe plastic bags, remove as much air as possible from the bag to prevent freezer burn. Vacuum sealed bags are the best option, but you can still use standard resealable plastic bags as long as they are approved for freezer use.

    • If packing the eggplant in freezer-safe plastic containers, leave at least 1/2-inch (1.27-cm) empty headspace at the top of the container. This extra space allows the eggplant room to expand as it freezes.

    • Glass containers are not recommended for freezer use.

    • Label the bag or container with the current date so that you will know, in the future, how long your batch of eggplant has been sitting in the freezer.


  2. Separate slices with plastic wrap or freezer wrap, if desired.[2] If you plan on using the eggplant slices separately in the future, you should layer well-drained slices with alternating layers of plastic wrap or freezer paper.


    • This step is only optional, but if you do not take this precaution, the slices will stick together upon freezing.


  3. Freeze until ready to use. Typically, frozen eggplant stays good for about 9 months.


    • Vacuum-sealed eggplant that is deep frozen will will retain its quality for about 14 months.


Part Four: Alternative Methods


  1. Bake the eggplant before freezing it. Another way to freeze eggplant is in pre-cooked form.[3]


    • Preheat the oven to 400 degrees Fahrenheit (204 degrees Celsius). Prepare a shallow baking sheet by covering it with aluminum foil.

    • Use a fork to prick the eggplant multiple times. Pricking the eggplant prevents pressure from building up inside of it as it bakes. The more holes you create, the safer it will be.

    • Roast the eggplant 30 to 60 minutes. The eggplant is ready once it begins to collapse inside the oven. Smaller eggplants will only take 30 minutes, but larger ones may take up to an hour.

    • Scoop out the flesh. When the eggplant is cool to the touch, cut it open lengthwise using a knife. Use a metal spoon to dig out the flesh.

    • Pack the flesh into airtight containers. Leave 1/2-inch (1.27-cm) headspace in each container.

    • Freeze up to 12 months.


  2. Prepare slices for eggplant parmesan. If you plan on using the eggplant for eggplant parmesan, you can coat the eggplant slices in breadcrumbs and freeze without baking it.


    • Wash and slice the eggplant as you would if freezing plain, blanched slices.

    • Dip each slice in milk, beaten egg, or frying batter.

    • Coat the slices in a mixture of seasoned bread crumbs. The bread crumbs can be seasoned with Italian herbs, Parmesan cheese, or left as plain, dry bread crumbs.

    • Wrap the slices in wax paper. Instead of merely layering the slices between pieces of plastic wrap, make sure that each breaded slice is completely wrapped in its own sheet of wax paper.

    • Freeze up to 6 months.

    • To use, thaw the slices in the refrigerator and bake or fry them as you usually would.


Edit Things You'll Need


  • Sharp kitchen knife

  • Vegetable peeler

  • Vegetable brush

  • Large stockpot

  • Large bowl

  • Freezer-safe container or bag

  • Plastic wrap or freezer wrap

  • Baking sheet

  • Aluminum foil

  • Fork

  • Oven mitts

  • Wax paper


Edit Sources and Citations


Article Tools


Fuente